Creating a Custom Sheet index
While helping a client develop their standards in Revit, they really liked the idea of an automated “Sheet List” on their cover sheet. But, then again, who wouldn’t, right? As we started working with it, they noticed that out of the box it just does alphabetical order like everything else in Revit. That wasn’t going to work for them, so I had to show them how to do “Project Parameters” to be able to sort on that data to reorder the sheet list the way they wanted to do it. Let’s work through those steps so everyone can take advantage of the “Sheet List” feature in Revit.

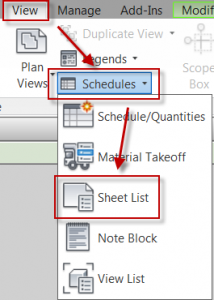
If you haven’t done a “Sheet List” in Revit, let’s get the base built and go from there. Go to the “View” tab and select the “Schedules” drop-down and pick “Sheet List”.

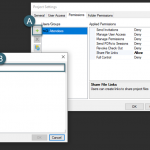
In the “Sheet List Properties” we will need to add two “Parameters” to get this working so someone can have the ability to control the order they we want everything to be in. See below the two parameters that you will need to do and the settings that we need to get this to work.


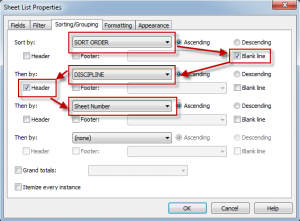
With the parameters built, we now need to get into the “Sorting/Grouping” tab to change the settings so the sheet list will begin to sort the data the way we want. Below is the order that you can choose, but of course, you can change it if needed.

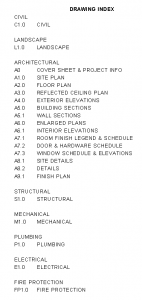
At this point, you can go to the “Formatting” and “Appearance” tab to any of the other settings to make your sheet index look that way you intend. Now, go ahead and select “OK” to get out of the dialogue box and start making some sheets if you don’t have any. Also, notice how Revit has picked up the existing ones and placed them in your sheet index.


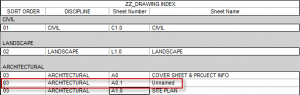
You should notice that your existing (or new) sheets do not know how to sort using your new project parameters. The other thing you will notice is that you probably do not want to see the “Sort Order” on your cover sheet when you plot. We will address that issue, but let’s make sure we understand how the new sheet index works.
The sort is a simple number to tell Revit where to put in the list. Currently it is blank. Type in “03” to create a sort for the Architectural discipline. Speaking of the discipline, type in Architectural to create a new one. What’s more, Revit will remember these settings for the next sheets.
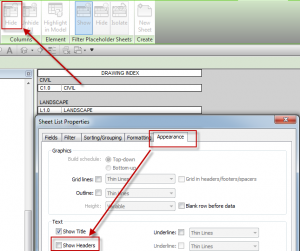

Now you will notice in the above screen shoots that the name of the sheet index is “ZZ_DRAWING INDEX”. We used “ZZ” so that a “working” schedule is always at the bottom; furthermore, “ZZ” designates that this is a working schedule and it never gets placed on a sheet. To create this, we simply right-clicked and did a “Duplicate” and renamed it. As for the original schedule, we turned off “Show Headers” under the “Appearance” tab and did “Hide” column on the ribbon, placing it on the cover sheet.
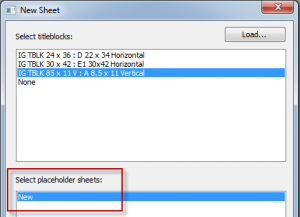

Finally, the other disciplines will need to be added so they show on the sheet index. This was done when creating a new sheet by using the “Select placeholder sheet”.

I hope this sheds some light on using the sheet index successfully and how to set it up in your workplace.
See you in class,
Jarod