Creating Better Shaded Views from Revit
In this Click Saver I want to talk about how to get better images from Revit for marketing or proposals. Sometimes old habits are hard to kill because everyone thinks that you have to immediately go to a photo editing software to do this. Now I’m not saying that what I’m going to show you is a fix all for everything but at least you can get a better color base image from Revit then you maybe thought possible. Below is what most people typically think of when getting a color image out from Revit.
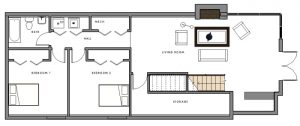
What we are looking for is additional color and shadows to help enhance the image before exporting it out or maybe even just throwing it on a sheet in Revit and printing it.
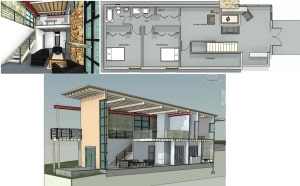
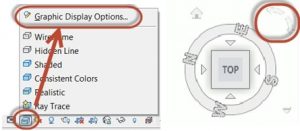
So how am I getting this type of look in Revit? First thing, for plan views I’m actually using the “Duplicate” tool using the default 3D view in Revit as my starting point. Then with the “View Cube” I’m picking on “Top” to get the top down view. You might have to use the arrows at the top right of the “View Cube” to get the plan view rotated correctly. Once that is done, down on the Viewbar I’m picking on the Visual Style button and using the “Graphic Display Options” tool for the next settings.
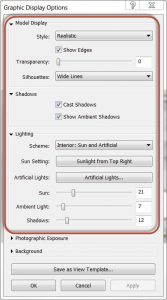
Quite a few people do not realize how much control you have in the dialog box, plus you can use the Apply button to preview your changes to see how you are doing. For the plan view that I did above I changed these settings:
- Set “Style” to “Realistic”, this helps get the rendering materials to show.
- Turn on the “Show edges”.
- Changed the “Silhouettes” to “Wide Lines”, it helps take some of the lines and fatten them up instead of having all the lines have the same lineweight.
- For “Shadows” I like to turn on “Show Ambient Shadows”, this creates a soft shadow effect and this time did turn on “Cast Shadows”.
- When turning on “Cast Shadows” they will come out very dark, to fix this in the “Lighting” option I like use the “Shadows” slider to lighten them up, in this case I set it to “12”.
- Since I’m using “Realistic” in the “Lighting” option and can take advantage of the “Scheme” settings. For this one I’m using “Interior: Sun and Artificial” with “Sun” at “21” and “Ambient Light” at “7”.
You usually will need to change the “Sun Setting” so the shadows have a better angle. Pick on the “Sunlight from Top Right” and use the “Duplicate” button to make a new Preset. Now change the “Azimuth” and “Altitude”, I switched mine to “175” and “15”. You might need to fix the “Ground Plane at Level” so the shadows come in correctly, mine needed to be set at “Level 1”.

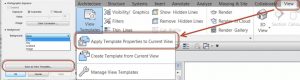
The bottom half of the dialog box will give you some additional options to enhance the image. If you have the “Style” set to “Realistic” then you can change the settings for “Photographic Exposure”. If the view happens to be a “Camera” then work with the “Background” drop-down to either add “Sky” or “Gradient”, or better yet add a “Image” from the job site. The big bonus is saving all of these setting to a “View Template” so you can reuse the same exact settings in another view. On the Ribbon use the “View” tab then the “View Templates” drop-down to “Apply” it.
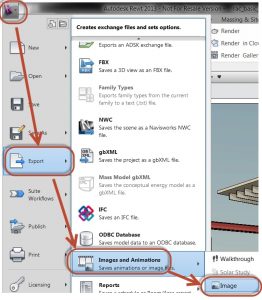
Hopefully with these tools in hand you can see how quickly you can enhance a black and white or color shaded view. If you don’t want to plot it but just need it as an image file then use the “Application Menu” (Purple R), select “Export”, then “Images and Animations”, and finally “Image”.
Next month I want to show you the sneaky trick on how I got Door Swings and Room Tags to show on my top down “3D” plan view. The problem with regular plan views is they don’t display all of the “Graphic Display Options” correctly so there are some tricks on putting all of this together in one view. See you in class, Jarod