Missing Maps Error Using Arnold
These days, most users are applying their materials through the Revit models, assigning them directly to the families. This is necessary when rendering directly in Revit and is quite useful as well when using software like Enscape or Twinmotion. It is also very useful when importing a model into 3ds Max but here is where a slight problem occurs.
In this example, I’ll import the Residential_Sample_Project.rvt directly into 3ds Max. The materials imported from Revit are all the old Autodesk Pro materials from ages ago and they do not render well in Arnold. It does not matter if you import directly or export the file first to FBX from within Revit, the results will be the same.
Upgrading the materials is quick and easy using Scene Converter, found under the Rendering pull down menu. Once the upgrade is complete, you go to render the file only to be greeted with an aborted render with errors. The cause of this is missing maps, as noted in the error dialog. I’ve tried altering the Scene Converter preset to delete missing maps, but this does not seem to work and leaves the Bitmap in the material with None for the file path.
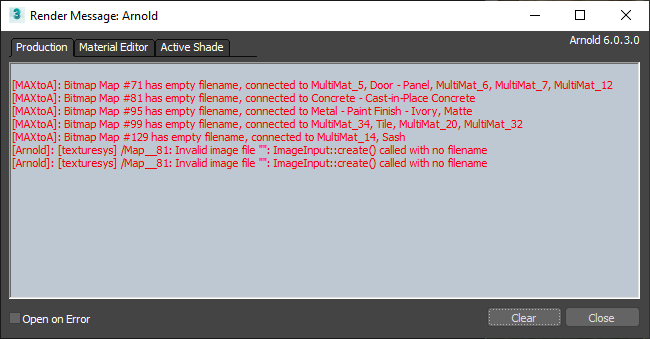
Fortunately, as annoying as this is, Arnold will actually help you find the materials with missing maps. Open the Material/Map browser, either from the Material Editor dialog or the Rendering pull down menu, and then expand the Scene Materials rollout. Look down the list at the icons and anything that has a fully black sample slot surrounded by colored corner brackets has a missing map.
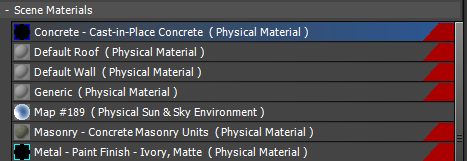
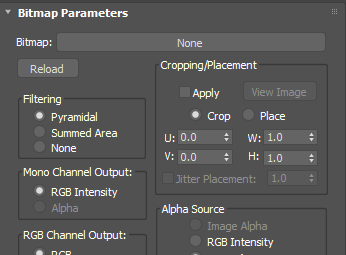
To correct this, copy these materials from the Material/Map Browser to the Material Editors as Instances. The sample slot for the material will show a black square with colored corners, again indicating that it is missing maps. Drill into the material to find the maps then check to make sure they have a bitmap assigned. If not, delete the bitmap from the material. As soon as all of the missing maps have been removed from a material, its sample slot will show in the Material Editor. Sweep through all of the materials and the file will now render properly.
The million dollar question is why does this happen? The answer has to do with procedural maps in Revit. Currently, they are not translated by Scene Converter and for some reason are switched to bitmaps with no path or file assigned to them. For some of the materials, like the Wall Paint, the map is assigned in the background through the selection of the Application parameter. In other materials, it will be applied to one of the map parameters. In general, you will have more control over your material if you assign a Generic material to the family rather than one of the Autodesk Pro materials and that allows you to better monitor and control these types of problems.
If you are using a centralized material library for Revit, it may be faster and easier to have someone go through and correct these materials in the Revit library rather than having to sweep for missing maps in 3ds Max each time you import a model. A new filter from Autodesk for the Scene Converter that would remove the procedural map automatically is another solution but it’s not here yet and we do have work to get done.
Happy rendering!
Stephen Gabriel is a Design Technology Specialist at MG AEC Technology Partners. Stephen works with architects and other designers to help them visualize their designs and communicate their intents to clients through the use of rendered images, animations and virtual reality experiences.