Revit Rendering Materials: Sharing Amongst Home, Office and the Cloud
As more and more people are adopting the Revit platform, they are discovering the rendering tool and using it more on projects. With that also comes finding, building or creating your own rendering materials (image files) for your projects. Because of that, sometimes an issue arises concerning knowing where those extra image files are being stored and how to access them if you need to go offsite.
Recently, a few clients have been running into this issue, so my recommendation for best practice is to start creating a specific folder for rendering materials under the project folder. Place all of the custom images and bump files in this folder, that way, if someone goes offsite, or takes the project home, they can grab this folder and won’t get the error stating that you are missing textures when rendering.
Now that you have made the folder under your project folder, you need to tell Revit where it lives. Go to the Application Menu, the purple R at the top left, and go to “Options”.

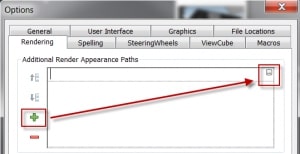
Click on the “Rendering” tab and select the green “+” sign to add the new custom folder for your project. Now, pick on the browse button to add the path location for Revit.

Once done, pick the “Ok” button and you are all set to go. If you ever go offsite, make sure to download this folder to your local drive and add the appropriate path so Revit re-establishes where to find the images for rendering purposes.
Hope to see you in class,
Jarod Schultz


